Azure RMS in Action: What administrators and users see


Introduction
The pictures in this section show some typical examples of how administrators and users can use Azure RMS to help protect sensitive or confidential information.
Note
In all these examples where Azure RMS protects data, the content owner continues to have full access to the data (file or email), even if the applied protection grants permissions to a group that the owner wasn’t a member of, or even if the applied protection includes an expiration date.
Similarly, IT can always access the protected data without restrictions, by using the super user feature of Rights Management that grants delegated access to authorized users or services that you specify. In addition, IT can track and monitor usage for data that has been protected—for example, who is accessing the data and when.
For other screenshots and videos that show RMS in action, check the Microsoft Rights Management services portal, the Microsoft Rights Management (RMS) Team Blog, and curated content for Azure RMS on the Curah! site.
Activating and configuring Rights Management
Although you can use Windows PowerShell to activate and configure Azure RMS, it’s easiest from the management portal. As soon as the service is activated, you have two default templates that administrators and users can select to quickly and easily apply information protection to files. But you can also create your own custom templates for additional options and settings.
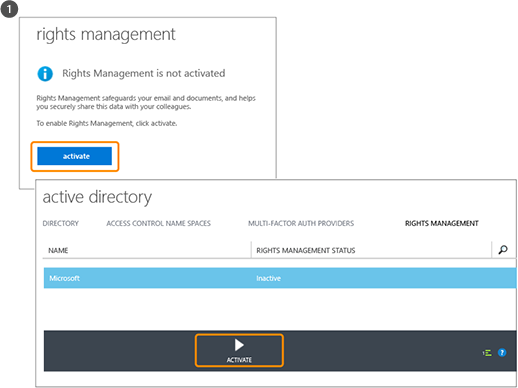
You can use either the Office 365 admin center (first picture) or the Azure portal (second picture) to activate RMS. Just one click to activate and another click to confirm, then information protection is enabled for administrators and users in your organization.
After activation, two rights policy templates are automatically available for your organization. One template is for read-only (Confidential View Only is included in the name), the other for read and modify access (Confidential).
When these templates are applied to files or emails, they restrict access to users in your organization. This is a very quick and easy way to help prevent your company data leaking to people outside your organization.
Tip
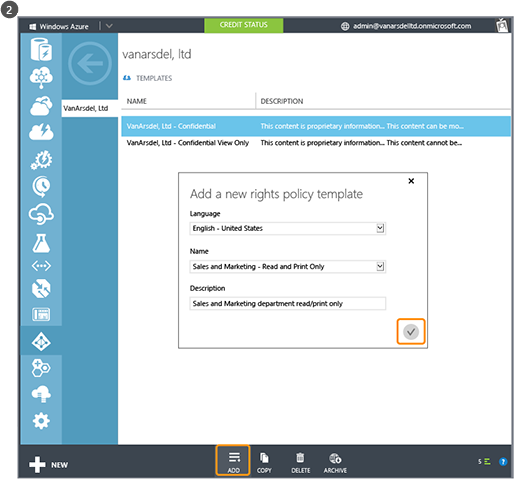
You can easily recognize these default templates, because they are automatically prefixed by your organization name. In our example, VanArsdel, Ltd.
If you do not want users to see these templates or if you want to create your own templates, you can do this from the Azure portal. As this picture shows, a wizard takes you through the custom template creation process.
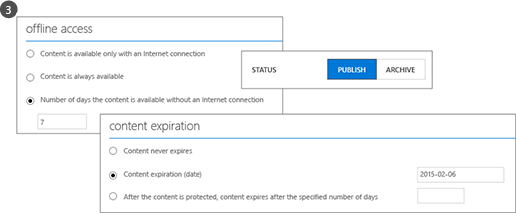
Offline access, expiration settings, and whether to publish the template immediately (make it visible in applications that support Rights Management) are some of the configuration settings available if you decide to create your own templates.
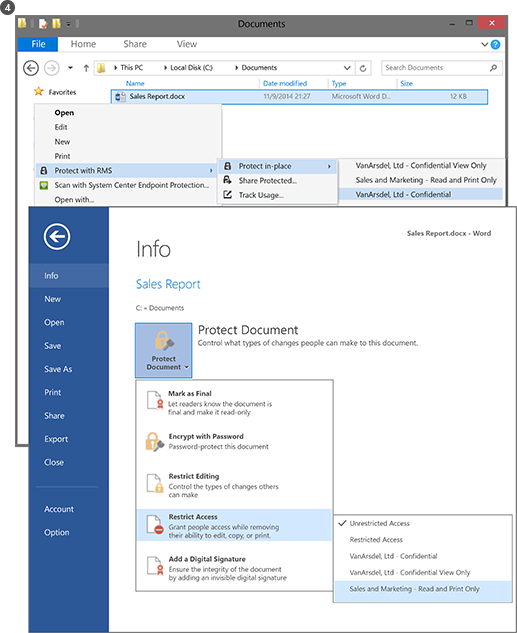
As a result of publishing these templates, users can now select them in applications such as File Explorer and Microsoft Word:
- A user could choose the default template, VanArsdel, Ltd – Confidential. Then, only employees from the VanArsdel organization can open and use this document, even if it’s later emailed to somebody outside the organization or saved to a public location.
- A user could choose the custom template that the administrator created, Sales and Marketing – Read and Print Only. Then, not only is the file protected from people outside the organization, but it’s also restricted to employees from the Sales and Marketing department. Further, these employees do not have full rights to the document, only read and print. For example, they cannot modify it or copy from it.
For more information, see Activating Azure Rights Management and Configuring Custom Templates for Azure Rights Management. To help users protect important company files, see Helping Users to Protect Files by Using Azure Rights Management.
Automatically protecting files on file servers running Windows Server and File Classification Infrastructure
This example shows how you can use Azure RMS to automatically protect files on file servers that run at least Windows Server 2012 and are configured to use File Classification Infrastructure.
There are many ways to apply classification values to files. For example, you can inspect the contents of files and accordingly apply built-in classifications such as Confidentiality and Personally Identifiable Information. However, in this example, an administrator creates a custom classification of Marketing that is automatically applied to all user documents that are saved in the Marketing Promotions folder. Although this folder is protected with NTFS permissions that restricts access to members of the Marketing group, the administrator knows that these permissions can be lost if somebody from that group moves or emails the files. Then, the information in the files could be accessed by unauthorized users.
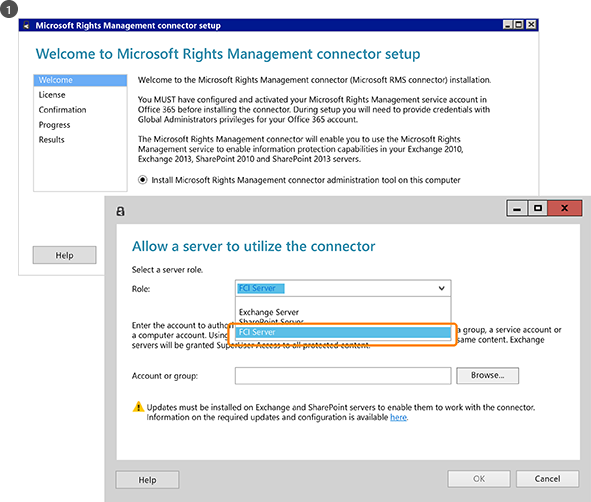
The administrators installs and configures the Rights Management (RMS) connector, which acts as a relay between on-premises servers and Azure RMS.
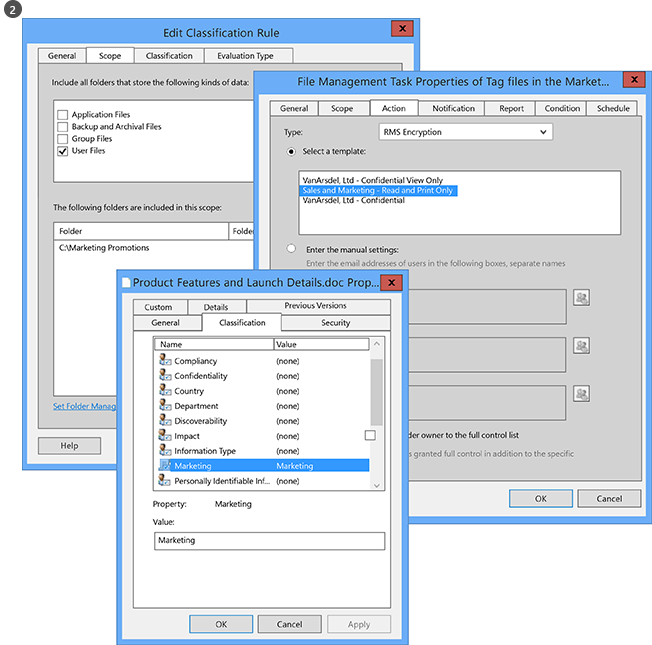
On the file server, the administrator configures the classification rules and tasks so that all user files in the Marketing Promotions folder are automatically classified as Marketing and protected with RMS encryption.
She selects the custom RMS template that was created in our first example, which restricts access to members of the Sales and Marketing departments: Sales and Marketing – Read and Print Only.
As a result, all documents in that folder are automatically configured with the Marketing classification and protected by the Sales and Marketing RMS template.
How RMS helps to prevent data leaking to people who should not have access to sensitive or confidential information:
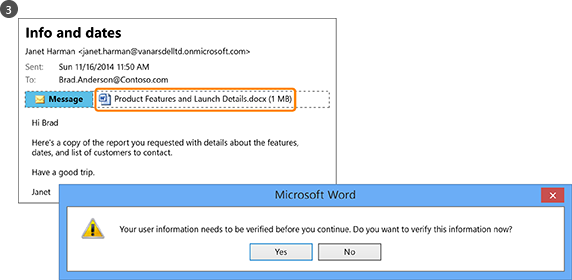
- Janet, from Marketing, emails a confidential report from the Marketing Promotions folder. This report contains new product features and advertising plans and is requested by a co-worker who is currently traveling on business. However, Janet mistakenly emails it to the wrong person—she didn’t notice that she accidentally selected a recipient with a similar name, in another company.
- The recipient cannot read the confidential report because he is not a member of the Sales and Marketing group.
Automatically protecting emails with Exchange Online and data loss prevention policies
The previous example showed how you could automatically protect files that contain sensitive or confidential information, but what if the information is not in a file, but in an email message? This is where Exchange Online data loss prevention (DLP) policies comes in, either prompting users to apply information protection (by using Policy Tips) or automatically applying it for them (by using transport rules).
In this example, the administrator configures a policy to help keep the organization in compliance with US regulations for protecting personally identifiable information data, but rules can also be configured for other compliance regulations, or custom rules that you define.
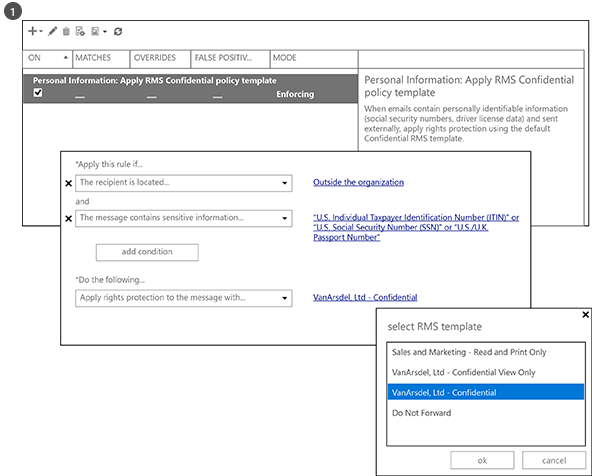
The Exchange template named U.S. Personally Identifiable Information (PII) Data is used by the administrator to create and configure a new DLP policy. This template looks for information such as social security numbers and driver license numbers in email messages.
The rules are configured so that email messages that contain this information and that are sent outside the organization automatically have rights protection applied by using an RMS template that restricts access to company employees only.
Here, the rule is configured to use one of the default templates, VanArsdel, Ltd – Confidential, from our first example. But you can also see how the choice of templates includes any custom templates you’ve created, and a No Do Forward option that is specific to Exchange.
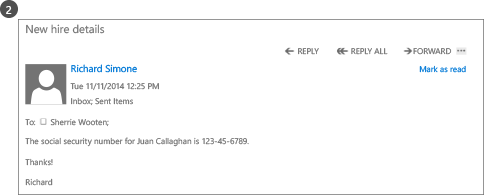
The hiring manager writes an email message that contains the social security number of a recently hired employee. He sends this email message to Sherrie in the Human Resources department.
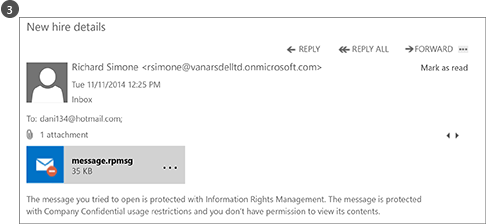
If this email message is sent or forwarded to somebody outside the organization, the DLP rule automatically applies rights protection.
The email is encrypted when it leaves the organization’s infrastructure, so that the social security number in the email message cannot be read while in transit, or in the recipient’s inbox. The recipient will not be able to read the message unless he or she is a VanArsdel employee.
For more information, see the following sections:
- Exchange Online and Exchange Server in the How Applications Support Azure Rights Management topic.
- Exchange Online: IRM Configuration in the Configuring Applications for Azure Rights Management topic.
Automatically protecting files with SharePoint Online and protected libraries
This shows how you can easily protect documents when you use SharePoint Online and protected libraries.
In this example, the SharePoint administrator for Contoso has created a library for each department that they use to centrally store and check out documents for editing and version control. For example, there is a library for Sales, one for Marketing, one for Human Resources, and so on. When a new document is uploaded or created in one of these protected libraries, that document inherits the protection of the library (no need to select a rights policy template) and that document is automatically protected and remains protected, even if it’s moved outside the SharePoint library.

The administrator enables Information Rights Management for the SharePoint site.
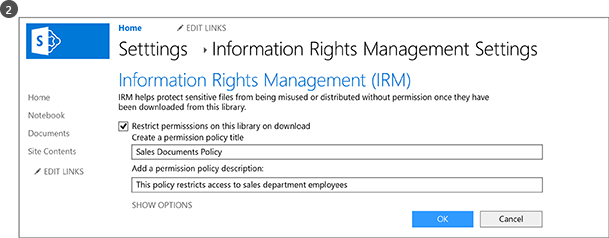
Then, she enables Rights Management for a library. Although there are additional options, this simple setting is often all that’s needed.
When new documents are created in this library, or when new documents are uploaded to it, they automatically inherit the protection that’s configured for the library.
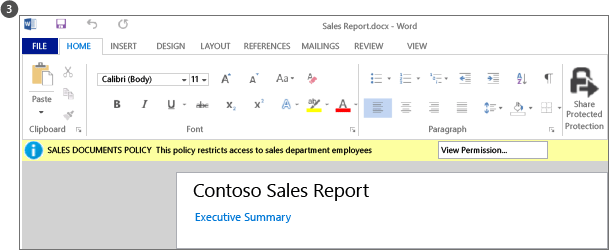
When somebody from the sales department checks out this sales report from the library, they can clearly see from the information banner at the top that it’s a protected document with restricted access.
The document remains protected even if the user renames it, saves it to another location, or shares it by email. No matter what the file is named, where it’s stored, or whether it’s shared by email, only members of the sales department can read it.
For more information, see the following sections:
- SharePoint Online and SharePoint Server in the How Applications Support Azure Rights Management topic.
- SharePoint Online and OneDrive for Business: IRM Configuration in the Configuring Applications for Azure Rights Management topic.
Automatically protecting files with SharePoint Online and protected libraries
The previous examples showed how administrators can automatically apply information protection to sensitive and confidential data. But there will be some occasions when users might need to apply this protection themselves. For example, they are collaborating with partners in another organization, they need custom permissions or settings that are not defined in templates, for or ad-hoc situations that are not covered by the previous examples. In these situations, users can apply the RMS templates themselves or configure custom permissions.
This example shows how users can easily share a document with somebody they’re collaborating with from another company, but still be able to protect the document and be confident that the recipient can read it, even from a popular mobile device. This scenario uses the Rights Management sharing application, which you can automatically deploy to Windows computers in your organization. Or, users can install it themselves.
In this example, Alice from Contoso, emails a confidential Word document that she sends to Bob, at Fabrikam. He reads the document on his iPad, but he could just as easily read it on an iPhone, an Android tablet or phone, a Mac computer, or a Windows phone or computer.
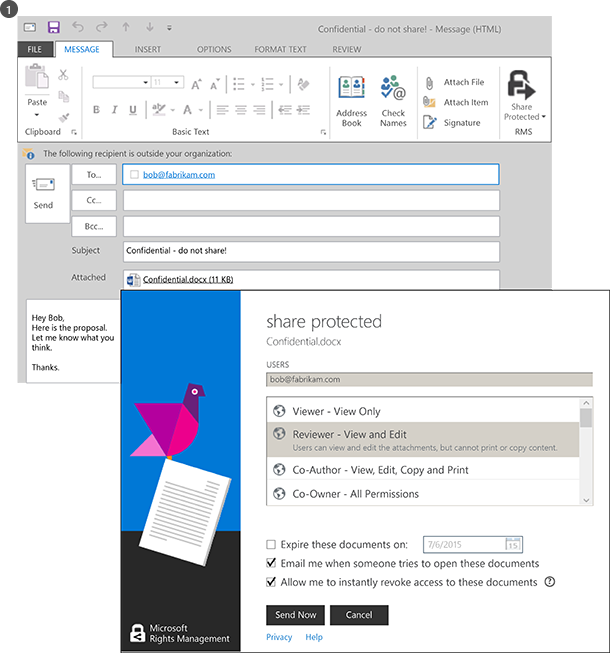
From her Windows PC, Alice creates a standard email message and attaches a document. She clicks Share Protected on the ribbon, which loads the share protected dialog box from the RMS sharing application.
Alice wants to restrict Bob to viewing and editing the document, and doesn’t want him to copy or print it, so she selects REVIEWER – View and Edit. She also wants to be emailed when somebody tries to open the document, and have the ability to revoke the document later if necessary and know that revocation will take effect immediately.

Bob sees the email on his iPad.
In addition to Alice’s message and attachment, there are instructions that he follows to sign up and install the RMS sharing app on his iPad.
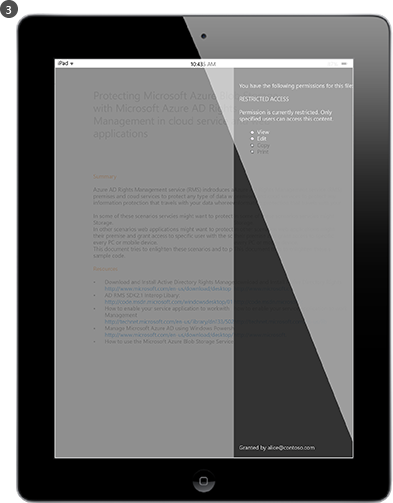
Bob can now open the attachment. He is first asked to sign in to confirm that he is the intended recipient. When Bob views the document, he also sees the restricted access information that tells him he can view and edit the document, but not copy or print.
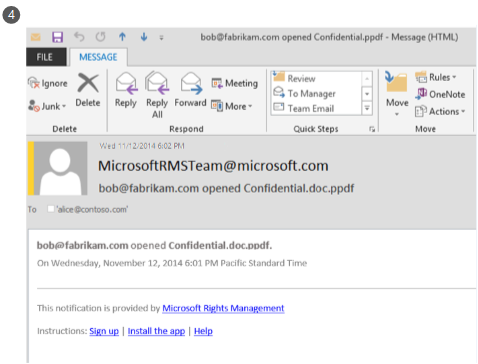
Alice receives an email message that tells her Bob successfully opened the document that she sent, and when he accessed the document.
If Bob forwards his email with the attachment, or saves it where others can access it, or it is intercepted on the network, other people will not be able to read the document.
For more information, see Protect a file that you share by email and View and use files that have been protected from the Rights Management sharing application user guide.
In addition, the Quick Start Tutorial for Azure Rights Management includes step-by-step instructions for this scenario.